domingo, 1 de mayo de 2016

Japanese-Style Stir-Fried Noodles with Beef

Why this recipe works:

For a home cook–friendly version of this classic Japanese noodle stir-fry, we started by isolating the best possible supermarket alternatives to hard-to-find Japanese ingredients. In place of chewy yakisoba noodles, we use lo mein noodles (which also contain an alkaline ingredient that gives them some elasticity) and undercook them to enhance their chew. We also rinse them very well with cold water, which removes surface starches and makes them appropriately slick. We treat thinly sliced flank steak with baking soda to ensure that each piece is tender and juicy. Soy sauce, Worcestershire, ketchup, and rice wine vinegar make up the savory-sweet sauce—a facsimile of the traditional version made with Japanese Worcestershire sauce.

Serves 4 to 6

This recipe calls for lo mein noodles, but use yakisoba noodles if you can find them and follow the same cooking directions. Garnish the noodles with pickled ginger (often found in the refrigerated section of the grocery store near tofu) and our Sesame-Orange Spice Blend (see related content) or, if you can find it, commercial shichimi togarashi.

Ingredients

  • 1/8 teaspoon baking soda
  • 12 ounces flank steak, trimmed, sliced lengthwise into 2- to 2 1/2-inch strips, each strip sliced crosswise 1/4 inch thick
  • 1/4 cup ketchup
  • 1/4 cup soy sauce
  • 2 tablespoons Worcestershire sauce
  • 1 1/2 tablespoons packed brown sugar
  • 3 garlic cloves, minced
  • 3 anchovy fillets, rinsed, patted dry, and minced
  • 1 teaspoon rice vinegar
  • 1 pound fresh or 8 ounces dried lo mein noodles
  • 1 tablespoon vegetable oil
  • 6 ounces shiitake mushrooms, stemmed and sliced 1/4 inch thick
  • 1 carrot, peeled and sliced 1/8 inch thick on bias
  • 3/4 cup chicken broth
  • 6 cups napa cabbage, sliced crosswise into 1/2-inch strips
  • 7 scallions, cut on bias into 1-inch lengths
  • Salt

Instructions


  1. 1. Combine 1 tablespoon water and baking soda in medium bowl. Add beef and toss to coat. Let sit at room temperature for 5 minutes.
    2. Whisk ketchup, soy sauce, Worcestershire, sugar, garlic, anchovies, and vinegar together in second bowl. Stir 2 tablespoons sauce into beef mixture and set aside remaining sauce.
    3. Bring 4 quarts water to boil in large pot. Add noodles and cook, stirring often, until almost tender (center should still be firm with slightly opaque dot), 3 to 10 minutes (cooking times will vary depending on whether you are using fresh or dry noodles). Drain noodles and rinse under cold running water until water runs clear. Drain well and set aside.
    4. Heat 1/2 teaspoon oil in 12-inch nonstick skillet over high heat until just smoking. Add mushrooms and carrot and cook, stirring occasionally, until vegetables are spotty brown, 2 to 3 minutes. Add 1/4 cup broth and cook until all liquid has evaporated and vegetables are tender, about 30 seconds. Transfer vegetables to bowl.
    5. Return skillet to high heat, add 1/2 teaspoon oil, and heat until beginning to smoke. Add cabbage and scallions and cook, without stirring, for 30 seconds. Cook, stirring occasionally, until cabbage and scallions are spotty brown and crisp-tender, 2 to 3 minutes. Transfer to bowl with mushrooms and carrot.
    6. Return skillet to high heat, add 1 teaspoon oil, and heat until beginning to smoke. Add half of beef in single layer. Cook, without stirring, for 30 seconds. Cook, stirring occasionally, until beef is spotty brown, 1 to 2 minutes. Transfer to bowl with vegetables. Repeat with remaining beef and remaining 1 teaspoon oil.
    7. Return skillet to high heat; add reserved sauce, remaining 1/2 cup broth, and noodles. Cook, scraping up any browned bits, until noodles are warmed through, about 1 minute. Transfer noodles to bowl with vegetables and beef and toss to combine. Season with salt to taste, and serve immediately.


Technique

How Asian Noodles Get Their Spring


Asian noodles come in countless varieties, but many, including yakisoba, ramen, and lo mein, are characterized by a satisfying chew. These springy noodles contain the same core ingredients as Italian pastas—wheat flour and water—along with two salts, sodium and potassium carbonates, that raise the pH of the dough. A little research confirmed that the alkaline environment increases the bonding between gluten strands, making the gluten network stronger and more elastic, for noodles that stretch and spring back. The effect of the alkalizing salts is clearly visible if you compare cooked Italian spaghetti strands with the alkaline noodles: The former swell more and have less give, while the latter stay firm and chewy.

HOLDING STRONG: Elastic alkaline noodles are so resilient that they can hold more than 4 ounces of weight before breaking. (Tender Italian spaghetti can hold only 1 3/4 ounces.)

Technique

The Other Worcestershire


Yakisoba sauce (Japanese Worcestershire sauce) is a thicker, sweeter relative of the familiar British kind. To create a facsimile with similar flavor and body to the popular Bull-Dog brand’s, we used widely available Lea & Perrins, doctoring it with ketchup, soy sauce, rice vinegar, and brown sugar.
Share:
Read More

Roasted Mushrooms with Parmesan and Pine Nuts

Why this recipe works:

For a rich, woodsy side dish, we combine straightforward cremini with meaty, smoky shiitakes. To ensure that the mushrooms are evenly seasoned and stay moist during roasting, we start by brining them in a saltwater solution. We then roast them in the oven for about an hour until they are deeply browned. Finally, we coat the mushrooms in melted butter and lemon juice before adding flavorful mix-ins: Parmesan, parsley, and pine nuts.

Serves 4

Cremini mushrooms, also called Baby Bella, vary in diameter. Quarter large (more than 2 inches) mushrooms, halve medium (1 to 2 inches) ones, and leave small (under 1 inch) ones whole.

Ingredients

  • Salt and pepper
  • 1 1/2 pounds cremini mushrooms, trimmed and left whole if small, halved if medium, or quartered if large
  • 1 pound shiitake mushrooms, stemmed, caps larger than 3 inches halved
  • 2 tablespoons extra-virgin olive oil
  • 2 tablespoons unsalted butter, melted
  • 1 teaspoon lemon juice
  • 1 ounce Parmesan cheese, grated (1/2 cup)
  • 2 tablespoons pine nuts, toasted
  • 2 tablespoons chopped fresh parsley

Instructions


  1. 1. Adjust oven rack to lowest position and heat oven to 450 degrees. Dissolve 5 teaspoons salt in 2 quarts room-temperature water in large container. Add cremini mushrooms and shiitake mushrooms to brine, cover with plate or bowl to submerge, and let stand for 10 minutes.
    2. Drain mushrooms in colander and pat dry with paper towels. Spread mushrooms evenly on rimmed baking sheet, drizzle with oil, and toss to coat. Roast until liquid from mushrooms has completely evaporated, 35 to 45 minutes.
    3. Remove sheet from oven (be careful of escaping steam when opening oven) and, using thin metal spatula, carefully stir mushrooms. Return to oven and continue to roast until mushrooms are deeply browned, 5 to 10 minutes longer.
    4. Combine melted butter and lemon juice in large bowl. Add mushrooms and toss to coat. Add Parmesan, pine nuts, and parsley and toss. Season with salt and pepper to taste; serve immediately.
Share:
Read More

Slow-Cooked Whole Carrots

Why this recipe works:

We wanted a technique for cooking whole carrots (currently a popular restaurant dish) that would yield a sweet and meltingly tender vegetable from one end to the other without the carrots becoming mushy or waterlogged. Gently “steeping” the carrots in warm water before cooking them firms up the vegetable’s cell walls so that they can be cooked for a long time without falling apart. We also top the carrots with a cartouche (a circle of parchment that sits directly on the food) during cooking to ensure that they are evenly cooked from end to end.

Serves 4 to 6

Use carrots that measure 3/4 to 1 1/4 inches across at the thickest end. The carrots can be served plain, but we recommend topping them with one of our relishes (see related content).

Ingredients

  • 3 cups water
  • 1 tablespoon unsalted butter
  • 1/2 teaspoon salt
  • 12 carrots (1 1/2 to 1 3/4 pounds), peeled

Instructions


  1. 1. Fold 12-inch square of parchment paper into quarters to create 6-inch square. Fold bottom right corner of square to top left corner to create triangle. Fold triangle again, right side over left, to create narrow triangle. Cut off 1/4 inch of tip of triangle to create small hole. Cut base of triangle straight across where it measures 5 inches from hole. Open paper round.
    2. Bring water, butter, and salt to simmer in 12-inch skillet over high heat. Remove pan from heat, add carrots in single layer, and place parchment round on top of carrots. Cover skillet and let stand for 20 minutes.
    3. Remove lid from skillet, leaving parchment round in place, and bring to simmer over high heat. Reduce heat to medium-low and simmer until almost all water has evaporated and carrots are very tender, about 45 minutes. Discard parchment round, increase heat to medium-high, and continue to cook carrots, shaking pan frequently, until they are lightly glazed and no water remains in skillet, 2 to 4 minutes longer. Transfer carrots to platter and serve.


Technique

Persistent Firmness—It’s a Real Thing


Precooking certain fruits or vegetables at a low temperature can help them retain a firm yet tender texture during a second cooking phase at a higher temperature. This phenomenon, called “persistent firmness,” is the key to achieving evenly cooked whole carrots—especially those that are thick on one end and tapered on the other. To initiate persistent firmness, we found that our carrots need to be precooked in 120- to 160-degree water for 20 minutes. During this warm bath, an enzyme in the carrot called pectin methylesterase (PME) is activated. PME alters the pectin in the vegetable in such a way that it is able to bind with calcium ions that are also present in the cells. This, in turn, fortifies the pectin, creating a strong network that is more resistant to breaking down when the carrots finish cooking at a higher temperature. The upshot? Carrots that are perfectly tender—but not at all mushy—from end to end.

Technique

Making the Case for Paper


Going to the trouble of making a parchment paper lid with a small hole in the middle, or a cartouche, is worth it. It works better than a metal lid to keep steam concentrated on the top of the carrots, so they cook at the same rate as the underside of the vegetables.

Technique

Making a Parchment Lid (Cartouche)

1. Fold 12-inch square of parchment into quarters to create 6-inch square.
2. With openings at top and right sides, fold bottom right corner of square to top left corner.
3. Fold triangle again, right side over left, to create narrow triangle.
4. Cut off 1/4 inch of tip to create hole. Cut base of triangle straight across where it measures 5 inches from hole.
Share:
Read More
, ,

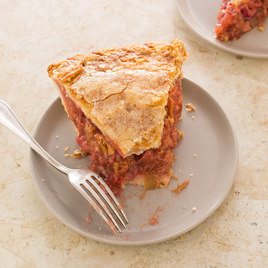
Strawberry-Rhubarb Pie


Why this recipe works:

Sweet strawberries and tart rhubarb are a winning flavor combination, but they can turn into a soupy mess when baked unless you take steps to manage their high water content. In our recipe, we macerate the rhubarb and some of the strawberries with sugar to draw out their excess liquid; then we cook the resulting syrup down with the remaining strawberries to make a jam-like mixture that is folded back into the rhubarb. Because we have removed the excess water, we are able to use less thickener and more fruit than is used in most strawberry-rhubarb pies, which results in an intensely flavored filling that is chunky and softly gelled. To complement the tartness of the fruit, we top our double-crust pie with a generous amount of water and sugar, which bakes to a crackly finish.

Serves 8

This dough is unusually moist and requires a full 1/4 cup of flour when rolling it out to prevent it from sticking. Rhubarb varies in the amount of trimming required. Buy 2 pounds to ensure that you end up with 7 cups of rhubarb pieces. (For tips on crimping the dough, see related content.) If desired, serve the pie with whipped cream or ice cream.

Ingredients

  • Crust
  • 2 1/2 cups (12 1/2 ounces) all purpose flour
  • 2 tablespoons sugar, plus 3 tablespoons for sprinkling
  • 1 teaspoon salt
  • 12 tablespoons butter, cut into 1/4-inch slices and chilled
  • 1/2 cup vegetable shortening, cut into 4 pieces and chilled
  • 1/4 cup vodka, chilled
  • 1/4 cup cold water, plus extra for brushing
  • Filling
  • 2 pounds rhubarb, trimmed and cut into 1/2-inch pieces (7 cups)
  • 1 1/4 cups (8 3/4 ounces) sugar
  • 1 pound strawberries, hulled, halved if less than 1 inch, quartered if more than 1 inch (3 to 4 cups)
  • 3 tablespoons instant tapioca

Instructions


  1. 1. FOR THE CRUST: Process 1 1/2 cups flour, 2 tablespoons sugar, and salt in food processor until combined, about 5 seconds. Scatter butter and shortening over top and process until incorporated and mixture begins to form uneven clumps with no remaining floury bits, about 15 seconds.
    2. Scrape down sides of bowl and redistribute dough evenly around processor blade. Sprinkle remaining 1 cup flour over dough and pulse until mixture has broken up into pieces and is evenly distributed around bowl, 4 to 6 pulses.
    3. Transfer mixture to large bowl. Sprinkle vodka and cold water over mixture. Using rubber spatula, stir and press dough until it sticks together.
    4. Divide dough in half. Turn each half onto sheet of plastic wrap and form into 4‑inch disk. Wrap disks tightly in plastic and refrigerate for 1 hour. Let chilled dough sit on counter to soften slightly, about 10 minutes, before rolling. (Wrapped dough can be refrigerated for up to 2 days or frozen for up to 1 month. If frozen, let dough thaw completely on counter before rolling.)
    5. FOR THE FILLING: While dough chills, combine rhubarb and sugar in bowl and microwave for 1 1/2 minutes. Stir and continue to microwave until sugar is mostly dissolved, about 1 minute longer. Stir in 1 cup strawberries and set aside for 30 minutes, stirring once halfway through.
    6. Drain rhubarb mixture through fine-mesh strainer set over large saucepan. Return drained rhubarb mixture to bowl and set aside. Add remaining strawberries to rhubarb liquid and cook over medium-high heat until strawberries are very soft and mixture is reduced to 1 1/2 cups, about 10 to 15 minutes. Mash berries with fork (mixture does not have to be smooth). Add strawberry mixture and tapioca to drained rhubarb mixture and stir to combine. Set aside.
    7. Roll 1 disk of dough into 12-inch circle on well-floured counter. Loosely roll dough around rolling pin and gently unroll onto 9-inch pie plate, letting excess dough hang over edge. Ease dough into plate by gently lifting edge of dough with your hand while pressing into plate bottom with your other hand. Wrap dough-lined plate loosely in plastic and refrigerate until dough is firm, about 30 minutes.
    8. Roll other disk of dough into 12-inch circle on well-floured counter, then transfer to parchment paper–lined baking sheet; cover with plastic and refrigerate for 30 minutes. Adjust rack to middle position and heat oven to 425 degrees.
    9. Transfer filling to chilled dough-lined plate and spread into even layer. Loosely roll remaining dough round around rolling pin and gently unroll it onto filling. Trim overhang to 1/2 inch beyond lip of plate. Pinch edges of top and bottom crusts firmly together. Tuck overhang under itself; folded edge should be flush with edge of plate. Crimp dough evenly around edge of plate using your fingers or butter knife. Brush surface thoroughly with extra water and sprinkle with 3 tablespoons sugar. Cut eight 2-inch slits in top crust.
    10. Place pie on parchment-lined rimmed baking sheet and bake until crust is set and begins to brown, about 25 minutes. Rotate pie and reduce oven temperature to 375 degrees; continue to bake until crust is deep golden brown and filling is bubbling, 30 to 40 minutes longer. If edges of pie begin to get too brown before pie is done, cover loosely with aluminum foil. Let cool on wire rack for 2 1/2 hours before serving.


Technique

What? Run it Under Water?


It sounded crazy when my colleague (who got the trick from his mother) suggested I do it, but here’s why sticking a pie under the tap before baking makes sense: It thoroughly moistens the dough so it can hold on to more sugar, which gets transformed into a candy-like layer in the oven. Ultimately, I opted for a safer (albeit less dramatic) method for the same result: I brushed the pastry thoroughly with water. Even this approach produced a crust that was able to grip a full 3 tablespoons of sugar.

Technique

The Runniest of All Pies


Most fruit pies are runny by nature, but the strawberry-rhubarb kind is the worst. That’s because the abundance of liquid in rhubarb floods the pie during baking, and the berries soak up some of the juices and bloat. We devised specific treatments for each component, resulting in a filling that gels softly and tastes bright. We also fixed rhubarb’s mushy texture.
PROBLEM, MUSHY RHUBARB: Rhubarb in pie fillings tends to “blow out” because its rigid structure can’t accommodate the expansion that occurs when the heat of the oven converts the stalk’s abundant moisture to steam. The result: pieces that have exploded rather than remained tender and intact.
PROBLEM, BLOATED BERRIES: Strawberries also soften during baking but remain intact because their structure is more flexible and better able to withstand expansion. In fact, strawberries in pie filling not only contain their own juices during baking but also soak up moisture thrown off by the rhubarb, which makes them unappealingly bloated.

SOLUTION, MICROWAVE: To rid the rhubarb of some water without cooking it too much, we toss the cut-up pieces with sugar (which helps draw out moisture) and briefly microwave them.

SOLUTION, MACERATE; THEN DRAIN: Resting the sugared rhubarb and some of the berries for 30 minutes draws out even more moisture that can then be drained off.

SOLUTION, REDUCE: We further minimize the juices but retain their flavor by reducing the shed liquid with the rest of the berries until the mixture turns jammy.

Technique

Technique: Venting Guides


Cutting vents in a pie’s top crust allows steam to escape—important for juicy fruit pies like strawberry-rhubarb. By cutting eight evenly spaced slits in a spoke-like pattern, we also create slicing guidelines that help produce even portions.
Share:
Read More
,

Pasta with Cauliflower, Bacon, and Bread Crumbs


Why this recipe works:

Pasta, nutty cauliflower, meaty bacon and crispy bread crumbs are a wonderful combination when the flavors and textures are all balanced. We brown our cauliflower in a skillet to develop its flavors and drive off some of the water to keep it from becoming mushy. By employing a risotto method and cooking our pasta in a small amount of water, we skip the draining step and make a creamy sauce for this dish as the pasta cooks. Finally, we top our pasta with bacon-flavored bread crumbs to add texture and another layer of flavor.

Serves 4 to 6

Farfalle, orecchiette, or gemelli can be substituted for the campanelle. If the pasta seems too dry, stir in up to 1/4 cup of hot water.

Ingredients

  • 3 slices bacon cut into 1/4-inch pieces
  • 1/2 cup panko bread crums
  • Salt and pepper
  • 2 tablespoons vegetable oil
  • 1 large head cauliflower (3 pounds), cored and cut into 1-inch florets
  • 1 onion, chopped fine
  • 1/2 teaspoon minced fresh thyme
  • 1 pound campanelle
  • 5 1/2 cups chicken broth
  • 1/2 cup dry white wine
  • 3 tablespoons minced fresh parsley
  • 1 teaspoon lemon juice, plus lemon wedges for serving


Instructions


  1. 1. Cook bacon in 12-inch skillet over medium-high heat until crispy, 5 to 7 minutes. Add panko and 1/4 teaspoon pepper and cook, stirring frequently, until panko is well browned, 2 to 4 minutes. Transfer panko mixture to bowl and wipe out skillet.
    2. Heat 5 teaspoons oil in now-empty skillet over medium-high heat until shimmering. Add cauliflower and 1 teaspoon salt; cook, stirring occasionally, until cauliflower is crisp-tender and browned in spots, 10 to 12 minutes. Remove pan from heat and cover to keep warm.
    3. Heat remaining 1 teaspoon oil in Dutch oven over medium heat until shimmering. Add onion, thyme, and 1/2 teaspoon salt; cook, stirring frequently, until onion has softened, 4 to 7 minutes. Increase heat to high, add pasta, broth, and wine, and bring to simmer. Cook pasta, stirring frequently, until most of liquid is absorbed and pasta is al dente, 8 to 10 minutes.
    4. Remove pot from heat; stir in parsley, lemon juice, and cauliflower; and season with salt and pepper to taste. Serve, passing panko mixture and lemon wedges separately.

Share:
Read More
,

Black Bean Burgers


Why this recipe works:

For great-tasting, cohesive burgers, we start by grinding tortilla chips in the food processor. We then pulse the beans with the chips so the beans maintain some texture. Eggs, and flour, which contains sticky amylopectin, help to hold the burger mix together. To keep the preparation simple, we add no-cook seasonings that bolster the Latin American flavor of the burgers. Letting the mixture sit in the refrigerator for an hour gives the starches time to soak up moisture from the egg, so the patties are easier to shape.

Serves 4

The black bean mixture needs to be refrigerated for at least 1 hour or up to 24 hours prior to cooking. When forming the patties, it is important to pack them firmly together. Our favorite canned black beans are Bush’s Best. Serve the burgers with your favorite toppings or with one of our spreads (see related content).

Ingredients

  • 2 (15-ounce) cans black beans, rinsed
  • 2 large eggs
  • 2 tablespoons flour
  • 4 scallions, minced
  • 3 tablespoons minced fresh cilantro
  • 2 garlic cloves, minced
  • 1 teaspoon ground cumin
  • 1 teaspoon hor sauce (optional)
  • 1/2 teaspoon ground coriander
  • 1/4 teaspoon salt
  • 1/4 teaspoon pepper
  • 1 ounce tortilla chips, crushed coarse (1/2 cup)
  • 8 teaspoons vegetable oil
  • 6 hamburger buns

Instructions


  1. 1. Line rimmed baking sheet with triple layer of paper towels and spread beans over towels. Let stand for 15 minutes.
    2. Whisk eggs and flour together in large bowl until uniform paste forms. Stir in scallions; cilantro; garlic; cumin; hot sauce, if using; coriander; salt; and pepper until well combined.
    3. Process tortilla chips in food processor until finely ground, about 30 seconds. Add black beans and pulse until beans are roughly broken down, about 5 pulses. Transfer black bean mixture to bowl with egg mixture and mix until well combined. Cover and refrigerate for at least 1 hour or up to 24 hours.
    4. Adjust oven rack to middle position and heat oven to 200 degrees. Divide bean mixture into 6 equal portions. Firmly pack each portion into tight ball, then flatten to 3 1/2-inch-diameter patty. (Patties can be wrapped individually in plastic wrap, placed in a zipper-lock bag, and frozen for up to 2 weeks. Thaw patties before cooking.)
    5. Heat 2 teaspoons oil in 10-inch nonstick skillet over medium heat until shimmering. Carefully place 3 patties in skillet and cook until bottoms are well browned and crisp, about 5 minutes. Flip patties, add 2 teaspoons oil, and cook second side until well browned and crisp, 3 to 5 minutes. Transfer burgers to wire rack set in rimmed baking sheet and place in oven to keep warm. Repeat with remaining 3 patties and 4 teaspoons oil. Transfer burgers to buns and serve.


Technique

Bean Burgers Gone Bad


Mixing lots of starchy binders with whole or coarsely chopped beans makes a dry, crumbly burger without much flavor. Pureeing the beans allows you to use minimal binders but turns the patty mushy and gluey.


CRUMBLY AND TASTELESS
Lots of starchy binders mute the bean flavor and dry out the burger.

WET AND MUSHY
Pureed beans need fewer binders but lead to burgers with a hummus-like texture.


Technique

Keys to an Ideal Black Bean Burger


Here’s what we did to create a burger full of earthy bean flavor that wasn’t muted by too much starchy binder.


DRY BEANS
Removing excess moisture by draining on paper towels helps cut down on the need for absorbent binders.


PULSE, DON’T PUREE
Pulsing the beans with tortilla chips (we processed them first) keeps the beans chunky for textural contrast.


GIVE IT EXTRA CLING
In addition to eggs and starchy tortilla chips, we add flour, which contains sticky amylopectin, to hold the mix together.


LET IT REST
Letting the mixture sit gives the starches time to soak up the eggs so the burgers are easier to handle.
Share:
Read More

Peri Peri Grilled Chicken


Why this recipe works:

The first step in making this spicy African grilled chicken dish is producing perfectly cooked meat and crisp skin. To do this, we add plenty of salt to the spice rub and let the chicken sit overnight, which seasons the meat throughout and helps it stay juicy and moist when cooked. We then set up the grill with a cooler side and a hotter side, as well as a pan of water to help regulate the temperature. After rendering the skin and charring it on the hotter side, we move the chicken to the cooler side to finish cooking gently, placing the dark meat closer to the heat and the white meat farther away. The next step is giving the chicken robust flavor. We start with a paste of garlic, shallot, bay leaves, lemon zest and juice, and pepper. Five-spice powder, tomato paste, and finely chopped peanuts give the dish complexity, depth, and richness. Finally, we use more commonly available—and just as fruity-tasting—arbol chiles, along with some cayenne pepper, in place of hard-to-find peri peri peppers, including a range to accommodate different heat-level preferences.

Serves 6 to 8

This recipe requires refrigerating the spice paste-coated chicken for at least 6 hours or up to 24 hours prior to cooking. When browning the chicken, move it away from the direct heat if any flare-ups occur. Serve the chicken with white rice.

Ingredients

  • 4 — 10 arbol chiles, stemmed
  • 3 tablespoons extra-virgin olive oil
  • 2 tablespoons salt
  • 8 garlic cloves, peeled
  • 2 tablespoons tomato paste
  • 1 shallot, chopped
  • 1 tablespoon sugar
  • 1 tablespoon paprika
  • 1 tablespoon five spice powder
  • 2 teaspoons grated lemon zest plus 1/4 cup juice (2 lemons)
  • 1 teaspoon pepper
  • 1/2 teaspoon cayenne pepper
  • 3 bay leaves, crushed
  • 6 pounds bone-in chicken pieces (breasts, thighs, and/or drumsticks), trimmed
  • 1/2 cup dry-roasted peanuts, chopped fine
  • 1 (13 by 9-inch) disposable aluminum pan (if using charcoal) or 2 (9-inch) disposable aluminum pie plates (if using gas)
  • Lemon wedges

Instructions


  1. 1. Process 4 arbols, oil, salt, garlic, tomato paste, shallot, sugar, paprika, five-spice powder, lemon zest and juice, pepper, cayenne, and bay leaves in blender until smooth, 10 to 20 seconds. Taste paste and add up to 6 additional arbols, depending on desired level of heat (spice paste should be slightly hotter than desired heat level of cooked chicken), and process until smooth. Using metal skewer, poke skin side of each chicken piece 8 to 10 times. Place chicken pieces, peanuts, and spice paste in large bowl or container and toss until chicken is evenly coated. Cover and refrigerate for at least 6 hours or up to 24 hours.
    2A. FOR A CHARCOAL GRILL: Open bottom vent halfway and place disposable pan filled with 3 cups water on 1 side of grill. Light large chimney starter filled with charcoal briquettes (6 quarts). When top coals are partially covered with ash, pour evenly over other half of grill (opposite disposable pan). Set cooking grate in place, cover, and open lid vent halfway. Heat grill until hot, about 5 minutes.
    2B. FOR A GAS GRILL: Place 2 disposable pie plates, each filled with 1 1/2 cups water, directly on 1 burner of gas grill (opposite primary burner). Turn all burners to high, cover, and heat grill until hot, about 15 minutes. Turn primary burner to medium-high and turn off other burner(s). (Adjust primary burner as needed to maintain grill temperature between 325 and 350 degrees.)
    3. Clean and oil cooking grate. Place chicken, skin side down, on hotter side of grill and cook until browned and blistered in spots, 2 to 5 minutes. Flip chicken and cook until second side is browned, 4 to 6 minutes. Move chicken to cooler side of grill and arrange, skin side up, with legs and thighs closest to fire and breasts farthest away. Cover (positioning lid vent over chicken if using charcoal) and cook until breasts register 160 degrees and legs and thighs register 175 degrees, 50 to 60 minutes.
    4. Transfer chicken to serving platter, tent with aluminum foil, and let rest for 10 minutes before serving, passing lemon wedges separately.


Technique

Core Technique: Grilling with Water


Whether you’re cooking this recipe or barbecued chicken, it’s key to cook the meat through gently for tender, juicy results. To do this, in addition to setting up the grill with a cooler side that is left free of coals, we also put an aluminum pan or pie plates filled with water on the grill. Both the pan (or plates) and the water absorb heat, lowering the heat overall and eliminating hot spots.


GAS
1. Fill 2 disposable aluminum pie plates with 1 1/2 cups water each.
2. Place pie plates on 1 burner, opposite primary burner, and set cooking grate in place.
3. Light burners as directed and proceed with recipe.


CHARCOAL
1. Fill 13 by 9-inch disposable aluminum pan with 3 cups water.
2. Place pan on 1 side of charcoal grate.
3. Once coals are lit, pour them next to pan, put cooking grate in place, and proceed with recipe.

Technique

Picking the Right Stand-In for the Peri Peri Peppers


Traditionally, dried African peri peri peppers, which are about 10 times hotter than serrano chiles, give this dish its spicy heat, but they are hard to find in the States.
Because they have a fruity, complex flavor in addition to heat, we found that no one chile could replace them. Instead, we landed on a combination of cayenne, for a baseline level of heat, and dried arbol chiles, which are spicy but, more important, have the right fruity note that mimics the peri peri chiles’ flavor.

PERI PERI PEPPERS


ARBOLS PLUS CAYENNE


Technique

Taste the Paste


In test after test, we found that pastes that tasted exactly as spicy as we wanted before cooking had a more tempered flavor in the final dish. After some research, we learned that when exposed to high heat, capsaicin, the primary chemical compound responsible for the chile’s heat, actually breaks down. After an hour on the grill, about 30 percent of the capsaicin will have broken down. To counteract this effect, your paste should taste just a bit spicier than you want prior to cooking. We call for using a relatively wide range of arbol peppers not only because tolerance for spiciness varies but also because the intensity of individual dried chiles can differ greatly. We suggest starting with four. Then, after mixing together the paste, give it a try and add up to six more chiles as necessary.
Share:
Read More